Remove squeak from T300 Steering Wheel
German:
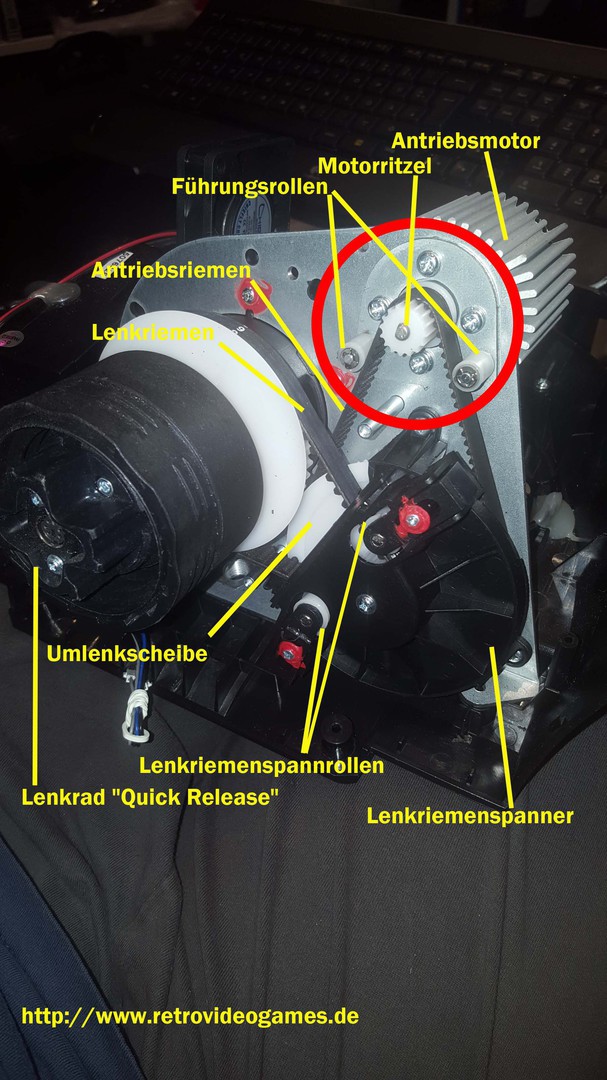
Funktion:
Im Kreis sieht man den Antriebs-/Force-Feedback Motor sowie das Ritzel. Daran befestigt ist der Antriebsriemen, der auf die untere Umlenkscheibe geht. Der Antriebsriemen wird mittels der 4 Schrauben
(im roten Kreis) gespannt.
An der Umlenkscheibe ist ein weiterer Riemen befestigt, der dann die Umlenkscheibe mit der Lenkachse verbindet. Dieser Riemen wird mit zwei Rollen gespannt (Schrauben mit rotem Sicherungslack).
Um das quietschen zu beseitigen bin ich folgendermaßen vorgegangen:
- Stromkabel von der Lenkradbase abziehen (Achtung: Kondensatoren können trotzdem noch voll geladen sein!)
- Lenkradbase öffnen (Schrauben unten und vorne entfernen).
- Lenkriemenspanner entfernen (4 Schrauben).
- Lenkriemen abnehmen
- Antriebsmotor/Spanner abbauen (4 Schrauben - siehe roter Kreis)
- Antriebsriemen abnehmen
- Umlenkscheibe abnehmen.
- Achse der Umlenkscheibe reinigen und neu schmieren/fetten
- Umlenkscheibe aufsetzen
- Antriebsriemen auflegen
- Lenkungsriemen anlegen
- Riemenspanner für Lenkriemen montieren (die Riemenspanner nicht lösen!)
- Antriebsmotor/Spanner montieren (habe den Motor mit Gefühl soweit nach oben gedrückt wie möglich)
- Lenkrad zum testen montieren und überprüfen ob quietschen weg ist
- Gehäuse wieder montieren
English:
Function:
In the circle you can see the Motion-/Force-Feedback motor with its´ pinion. On that is the driving belt mounted which connects to the lower redirection disc. The driving belt is tensed via 4 screw (red circle).
You will find on the redirection disc another belt (i call it steering belt) which connects the redirection disc with the steering shaft. This belt is tensed via 2 tension rolls (screws with the red blob).
To remove the sweaking noise i did the following:
- remove the power cord from the wheel (Beware there can also be dangerous voltages at electrical parts).
- open Steering Wheel Base (Remove the screws at the bottom and the front)
- remove steering wheel belt tension utility
- remove steering wheel belt
- demount Motion-/Force-Feedback motor (4 screws - look at the red circle)
- remove driving belt
- remove redirection disc
- clean the axes from the redirection disc and grease it
- mount redirection disc
- mount driving belt
- mount steering wheel belt
- mount the steering wheel belt tension utility (don´t loosen the screws from belt tension rolls)
- mount the Force-Feedback motor (push the motor and belt up and then tighten the 4 screws)
- for testing issues mount the steering wheel and check if the squeaking noise is gone.
- close the steering wheel housing
Sorry the pictures are only available in german language right now.